
Saturday, March 18, 2017
Spring Sign
Well, we are all waiting for spring, and to try to help it along, I made this sign for my front door. The tulips are a cut file from misskatecuttables.com


Sunday, March 12, 2017
leather tool roll up organizer
Don't we all need organization? Isn't it nice when you're doing a project and all your tools can be laid out for handy access? In this project, I used an old pair of jeans to make this organizer. It was fun sewing the little compartments and then being able to put my tools in it. hope you like it. The organizer is fashioned after a paint brush roll up organizer, and it worked very well for me.
Now I just have to come up with an organizer for my large leather stamps!

Now I just have to come up with an organizer for my large leather stamps!
Saturday, March 11, 2017
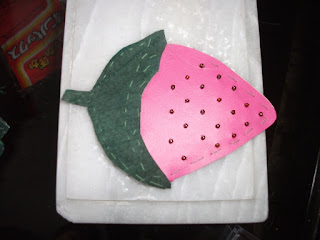
Strawberry leather coin purse
My first prototype is made out of scrap and fake leather. Really enjoyed sewing on the seed beads. This one will lay flat, but the next one I would like to make will be more 3 dimensional. The plan is to add more leaves on the top, a loop to hold a key chain, and decorative metal rivet or button.

Harry potter Hogwarts express miniature part 1 Exterior, window and benches
So I've been thinking about miniatures, and as Harry Potter is a fav of mine, I thought i would make an interior of Hogwarts Express, from the Philosopher's Stone. At Michael's they have a glass and wood display case that is about the right size to hold my "diorama". After extensive research, the scale for this will be 1:10. Why, you say? Why not one of the more common scale sizes? First of all, As the majority of it will be hand made, why not make it as big as possible, allowing for the most detail. There are some things that i will buy that is 1:12 scale, and hopefully will still look good. I of course, first went to my Silhouette software to size all things Hogwarts Express. Here is some of the window and door templates I cut out of cardstock and am painting.  Using my Silhouette Cameo, I cut out the inside window, the walls and door of the compartment out of box card. I used acetate sheets for the windows. Acrylic paint finishes it off.


For the exterior, I tried cutting out aluminum foil and painting it with model paint. The results were not to my liking. So I chose to make the exterior wall of the train with specialty cardstock from Michaels. It is quite shiny, but not the metallic I was hoping for. Now the yellow stripes need to be glued on and positioned in the display case.

Finally assembling the 2 sides of the train.The inside was assembled with box card and paint. The window was made using my silhouette cameo. This window took a lot of work to make but looks quite authentic. I glued multiple box card copies and painted the window piece with brown acrylic paint. Between the layers I put a piece of acetate so it would look like a window. The scene picture is actually a screenshot from the movie. This will sit on the mirror part of the display case.

The outside gave me a lot of grief, but the final result is shiny and close enough to resemble the outside of a train. I printed a Hogwarts Express logo and am pleased that i could fit it in. This piece is 2 sided and will fit inside the display glass. The inside is similar to the first picture.

The benches took months of looking at photos, taking screen shots of the movie, and measuring the dimensions. In the end, foam board was used as the base (it's going to be completely covered anyway). Bench seating is fabric over packing foam sheets. Even the arm rests are fabric covered foam board and foam pieces. Although the fabric is not exactly the same as in the movie, I am satisfied with the colour. After all that thinking and planning, I finally just did it. It's not perfect, but i think it will work.


Stay tuned for more!
 Using my Silhouette Cameo, I cut out the inside window, the walls and door of the compartment out of box card. I used acetate sheets for the windows. Acrylic paint finishes it off.


The outside gave me a lot of grief, but the final result is shiny and close enough to resemble the outside of a train. I printed a Hogwarts Express logo and am pleased that i could fit it in. This piece is 2 sided and will fit inside the display glass. The inside is similar to the first picture.

The benches took months of looking at photos, taking screen shots of the movie, and measuring the dimensions. In the end, foam board was used as the base (it's going to be completely covered anyway). Bench seating is fabric over packing foam sheets. Even the arm rests are fabric covered foam board and foam pieces. Although the fabric is not exactly the same as in the movie, I am satisfied with the colour. After all that thinking and planning, I finally just did it. It's not perfect, but i think it will work.


Stay tuned for more!
Tuesday, January 31, 2017
Crochet - Yes, another project !
So I finally got fed up not being able to make certain things by knitting, and tried my hand at crochet. First I made a yarn bowl to hold yarn as I work with it, so it doesn't roll away.
 It looks rough because the sides are made with t shirt yarn. But it is actually perfect to encase my balls of yarn. This would have been hard to make by knitting.


Here is my first project using the yarn bowl, I am knitting myself a caron cake yarn hat.
Next, I am making a floor rug. I started with a pretty blue yarn, and then will use t shirt yarn.

As I was making it, I learned how to add on to avoid "bowling". When it started to rumple, I would take it apart and not add on extra stitches. This project was a great way to learn techniques, and troubleshooting,

It looked a bit boring, so I added another ball of pretty yarn. I'm almost finished, and am very pleased with it. The cat sat on it right away, so there is the ultimate approval. As i have a big ball of cotton yarn, my next project will be crocheting dishcloths for Christmas presents. I will also try to knit a basic dishcloth to compare (knitting both sides so it doesn't curl up) See ya soon!
Friday, October 14, 2016
I don't finish anything

Here is my cutting file for a t shirt i had planned. Sometimes my span of attention is short, and it is a running joke that I don't always finish my projects. So I thought I'd make fun of myself with this t shirt. As you can see, it is in reverse. In order to cut out the iron-on vinyl so you can read it properly, it must be flipped horizontally, cut by the cutting machine this way, weeded, flipped over, and then ironed on.
A little about my silhouette cameo
I got my machine in 2014 , and although there was a bit of time I had to invest in learning the software, it was worth it in the end. My first project was designing t shirts that I printed out iron-on transfers with an ink jet printer. The kids in my family loved it, and were impressed. I mostly use it for scrapbook pages, but surprisingly it is quite versatile, and was definitely worth the investment. I have since used it for journaling on my scrapbook pages, as my writing is horrendous. In order to make a map of Stonehenge, I plotted the stones and printed out a template so I can make a to scale model. So there are many applications for the Silhouette cameo.
Subscribe to:
Posts (Atom)